Architecture
Following a monorepo architecture, the NextJet starter kit is designed to help you build scalable and maintainable applications.
The kit uses a Turborepo monorepo, making it easy to extend your project with features like a mobile app and share code and configs between applications.
With NextJet's modular architecture, you can add or remove features and customize the app to fit your needs.
You can manage code for different projects, like marketing sites and web apps, all in one place.
Each application gets its own subdomain, boosting your branding and adding a professional touch. Plus, it promotes teamwork by allowing code sharing between projects.
Folder Structure
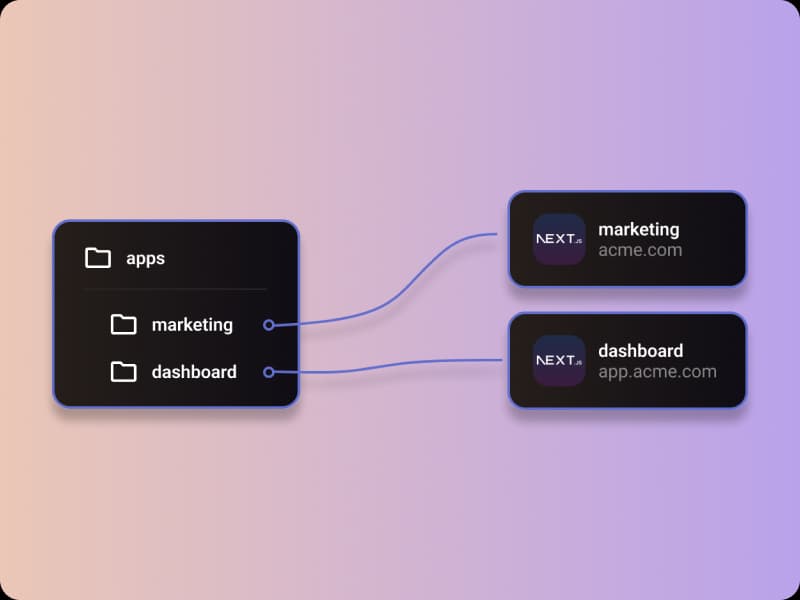
In a TurboRepo setup, different parts of the project are often organized into separate folders such as apps and packages to facilitate modular development, reuse, and maintenance.
Inside the apps folder are different applications we can deploy, like marketing sites, web apps, and mobile apps.
Everything inside the packages directory consists of reusable packages that can be shared among multiple applications or packages.
- marketing: Public facing marketing site, including blog, docs and legal pages.
- dashboard: Main application for the SaaS product.
- api: tRPC API.
- auth: Authentication logic.
- configs: Shared configurations for ESLint, Prettier, Tailwind, and TypeScript.
- crisp: Crisp chat support widget integration.
- db: Prisma database schema and migrations.
- email: Email templates and provider.
- payments: Payment provider integrations (Stripe, Lemon Squeezy).
- ui: Shared UI components (ShadCN and custom).
- utils: Shared constants and utility functions.
- validations: Shared Zod validations.
Feature Based Folder Structure
The NextJet starter kit uses a feature-based folder structure to organize code.
This structure groups related code together, making it easier to manage and scale the project.
We create folders adhering to a specific feature/route inside each route in the app folder.
By prefixing the folder name with _ (underscore), we can ensure that the folder is opted out of the Next.js file-system routing.
For example, the /admin and /billing routes inside the dashboard app in apps/dashboard/src/app/(dashboard) has the following structure:
- _components: Reusable components specific to the feature.
- _contexts: React context providers and consumers.
- _hooks: Custom hooks specific to the feature.
- _types: TypeScript types specific to the feature.
You can add more folders as needed for each feature to keep the code organized.
To avoid circular dependencies, use relative paths when importing within the same feature folder (e.g., the admin feature). Use absolute paths only when importing from different features.
Database Schema
The database schema is defined using Prisma in the packages/db/prisma/schema.prisma file.
This file contains the models that define the database tables and their relationships.
Entity Relationship Diagram
Here's an Entity Relationship Diagram (ERD) for the database schema to help you visualize and understand the relationships between the tables:

Models
The database schema consists of the following models/tables:
User
The User model stores user information including name, email, role, and status. It tracks whether a user has onboarded and if they are banned. Users can have multiple accounts, sessions, and a subscription.
You can extend the User model to include additional fields as needed.
Subscription
The Subscription model stores subscription details for users, including status, billing intervals, and period dates, linking each subscription to a user.
You can extend the Subscription model to include additional fields as needed.
Ban
The Ban model records ban details for users, including who banned or unbanned them, the reasons, and timestamps for ban and unban events.
You can extend the Ban model to include additional fields as needed.
Account
The Account model manages user authentication details for various providers. It stores tokens and metadata for third-party authentication, ensuring secure access.
This supports multiple authentication methods for the same user.
Do not modify this model. It is tightly coupled to Auth.js.
Session
The Session model keeps track of user sessions, storing session tokens and expiration times to manage user authentication states.
Do not modify this model. It is tightly coupled to Auth.js.
VerificationToken
The VerificationToken model handles email verification, storing tokens used for the magic link login and the user impersonation admin feature.
Do not modify this model. It is tightly coupled to Auth.js.
Import Paths
We employ absolute import paths to make it easier to import files and components across the project.
It also makes it easier to move files around without breaking imports.
Importing From The Root Of The Project
To import from the root of the project, you can use the ~ alias, like so:
Importing From The src Directory
The @ alias is used to import from the src directory, like so:
Importing From Packages
In order to import from a package, you can use the package name as the alias, like so:
Last updated on